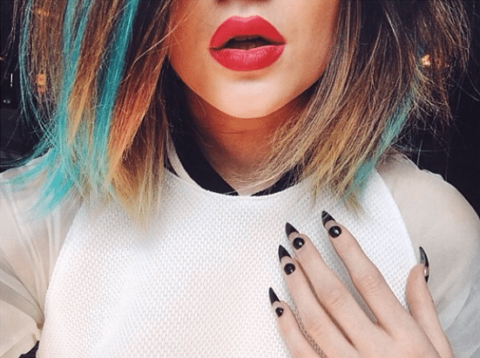
Vampy, full lips are just a gif tutorial away from being your new signature look

It’s a Kardashian world and we’re just living in it. These days, it’s impossible to walk into a conversation about beauty without the Kardashian-Jenner klan being mentioned (that’s some A+ contouring, you guys). However, our favourite of the bunch is easily Kylie. The youngest of the sisters, she also appears to be the one who is constantly ridden with angst, and we’re into it.
Recently, she’s been under fire for her ever-growing lips (surely by people who don’t understand how makeup works). Earlier this summer, we showed you how to achieve a Kylie-inspired nude pout for day, and now you can get the same pillow-like lips in a vampy red. Check out the step-by-step tutorial below.
Products used: M.A.C Lip Pencil in “Cherry” ($19, maccosmetics.ca), Sephora Luster Matte Lip Colour in “Scarlet” ($20, sephora.com), Obsessive Compulsive Cosmetics Anti-Feathering Clear Liner ($20, sephora.com)

Step 1: Lip balm, a makeup artist’s must-have product, is necessary for this look.
Apply your lip balm of choice to your lips before you begin. For this look you’ll use a lot of lip liner, matte lipstick and generally more product than you would for a daytime look, so to ensure your lips stay hydrated, make sure to coat both top and bottom lips evenly.

Step 2: Outline your top lip, concentrating on the cupid’s bow, and bottom lip with an anti-feathering pencil to prevent the colour from bleeding. There’s nothing worse that lipstick that ends up on your chin at the end of the day.
Vibrant liquid lipsticks can often smudge around the corners and anti-feathering liners will prevent that from happening.

Step 3: Here’s the time to put those high school art classes to good use. Line the lips with lip liner by slightly curving around the edges of your cupid’s bow and just outside the borders of the bottom lip. You’ll want to make sure the borders you’re creating still look natural by not straying too far from outside the top and bottom lip.
Once finished, make sure to fill in your soon-to-be voluminous lips with lip liner. Think of this as the makeup version of drawing within the lines.

Step 4: An artist is only as good as his or her tools, right? Make sure to use an angled lip brush to apply liquid lipstick to both lips. This will ensure you apply an even amount to the corners of your mouth so that your lips look even and one colour.

Step 5: Made a mistake? Don’t worry. Simple apply makeup remover to a q-tip or brush to remove any unnecessary product. Then apply a concealer over top of smudged areas and no one will ever know.

Step 6: Use a flat, thick lip brush to highlight your cupid’s bow with a little bronzer and apply dark shadow under the bottom lip to create definition. By highlighting the cupid’s bow, you’re pushing the top lip’s edges forward and by applying a subtle shadow to the bottom you’re tricking the eye into thinking that it’s naturally full.

Voila! You have a very beautiful (and very real) voluptuous pout.

Model: Elisa Martelli. Makeup by: Justine Veneracion. Shot and edited by: Takara Small


. However, our favourite of the bunch is easily Kylie. The youngest of the sisters, she also appears to be the one who is constantly ridden with angst, and we're into it.
Recently, she's been under fire for her ever-growing lips (surely by people who don't understand how makeup works). Earlier this summer, we showed you how to achieve a Kylie-inspired nude pout for day, and now you can get the same pillow-like lips in a vampy red. Check out the step-by-step tutorial below.
Products used: M.A.C Lip Pencil in "Cherry" ($19, maccosmetics.ca), Sephora Luster Matte Lip Colour in "Scarlet" ($20, sephora.com), Obsessive Compulsive Cosmetics Anti-Feathering Clear Liner ($20, sephora.com)
Step 1: Lip balm, a makeup artist’s must-have product, is necessary for this look.
Apply your lip balm of choice to your lips before you begin. For this look you’ll use a lot of lip liner, matte lipstick and generally more product than you would for a daytime look, so to ensure your lips stay hydrated, make sure to coat both top and bottom lips evenly.
Step 2: Outline your top lip, concentrating on the cupid's bow, and bottom lip with an anti-feathering pencil to prevent the colour from bleeding. There’s nothing worse that lipstick that ends up on your chin at the end of the day.
Vibrant liquid lipsticks can often smudge around the corners and anti-feathering liners will prevent that from happening.
Step 3: Here’s the time to put those high school art classes to good use. Line the lips with lip liner by slightly curving around the edges of your cupid's bow and just outside the borders of the bottom lip. You’ll want to make sure the borders you're creating still look natural by not straying too far from outside the top and bottom lip.
Once finished, make sure to fill in your soon-to-be voluminous lips with lip liner. Think of this as the makeup version of drawing within the lines.
Step 4: An artist is only as good as his or her tools, right? Make sure to use an angled lip brush to apply liquid lipstick to both lips. This will ensure you apply an even amount to the corners of your mouth so that your lips look even and one colour.
Step 5: Made a mistake? Don’t worry. Simple apply makeup remover to a q-tip or brush to remove any unnecessary product. Then apply a concealer over top of smudged areas and no one will ever know.
Step 6: Use a flat, thick lip brush to highlight your cupid's bow with a little bronzer and apply dark shadow under the bottom lip to create definition. By highlighting the cupid's bow, you're pushing the top lip’s edges forward and by applying a subtle shadow to the bottom you're tricking the eye into thinking that it's naturally full.
Voila! You have a very beautiful (and very real) voluptuous pout.
Model: Elisa Martelli. Makeup by: Justine Veneracion. Shot and edited by: Takara Small)